Unlock Your Inner Sushi Chef: The Joy of Crafting Restaurant-Quality Homemade Sushi
The idea of making sushi at home often conjures images of complex culinary techniques and elusive ingredients. Many assume that restaurant-quality sushi is best left to professional chefs. However, we're here to bust that myth! Creating delicious, customizable, and authentic homemade sushi is not only achievable but also incredibly fun and rewarding. Imagine an interactive meal where you and your loved ones hand-pick fillings, roll unique creations, and enjoy fresh, vibrant flavors tailored precisely to your taste.
From classic maki rolls to elegant nigiri and simple hand rolls, mastering the art of homemade sushi is more approachable than you might think. With a few key ingredients, basic kitchen tools, and a dash of patience, you can transform your kitchen into a sushi bar, serving up dishes that rival your favorite takeout spot – often at a fraction of the cost. Let's dive into how you can embark on your sushi-making adventure, turning fresh ingredients into culinary masterpieces.
The Heart of Sushi: Perfecting Your Sushi Rice
Every great piece of sushi begins with perfectly seasoned rice. It’s the foundation that holds everything together and provides a subtle, tangy-sweet flavor that complements your fillings. Don't underestimate its importance!
Choosing and Preparing the Rice:
- Sushi Rice: Always opt for short-grain Japanese sushi rice. Its higher starch content is essential for creating that desirable sticky, cohesive texture.
- Washing: Rinse your rice thoroughly under cold running water until the water runs clear. This removes excess starch, preventing your rice from becoming gummy.
- Cooking: Combine the rinsed rice with the appropriate amount of water in a medium pot. Bring to a boil, then reduce heat to low, cover tightly, and simmer for 20-25 minutes until the water is fully absorbed and the rice is tender. Resist the urge to lift the lid during cooking!
The Signature Seasoning:
The magic truly happens with the seasoned rice vinegar mixture, known as sushi-zu. This blend gives sushi rice its distinctive sweet, salty, and tangy profile.
- Ingredients: Typically, this consists of rice vinegar, sugar, and salt. For an extra layer of umami, many chefs steep a piece of kombu (dried kelp) in the vinegar mixture as it warms.
- Mixing: Gently warm the rice vinegar mixture until the sugar and salt dissolve, but don't boil it. Once your rice is cooked, transfer it to a large, non-metallic bowl (wood or plastic is ideal). Pour the seasoning over the hot rice and, using a cutting motion with a rice paddle or wooden spoon, gently fold it in. Avoid mashing the rice.
- Cooling: Fan the rice as you mix it to cool it quickly and give it a shiny appearance. Allow it to cool to room temperature before using. This prevents it from steaming your nori and fillings.
Beyond the Grain: Essential Ingredients & Creative Customizations
Once your sushi rice is ready, the world of fillings and flavors opens up. This is where the true customization and fun of homemade sushi come in!
Must-Have Elements:
- Nori Sheets: These thin, edible seaweed sheets are crucial for wrapping rolls, adding a briny, umami depth. Gently warming them in a dry pan or a preheated oven (1-2 minutes at 300°F/150°C) can enhance their flavor and make them more pliable.
- Sushi-Grade Fish: For raw fish sushi (like tuna, salmon, or yellowtail), always ensure it is sushi-grade. This term indicates that the fish has been handled and frozen in a way that makes it safe for raw consumption. Purchase from reputable fishmongers or Asian markets that specifically label their fish as such.
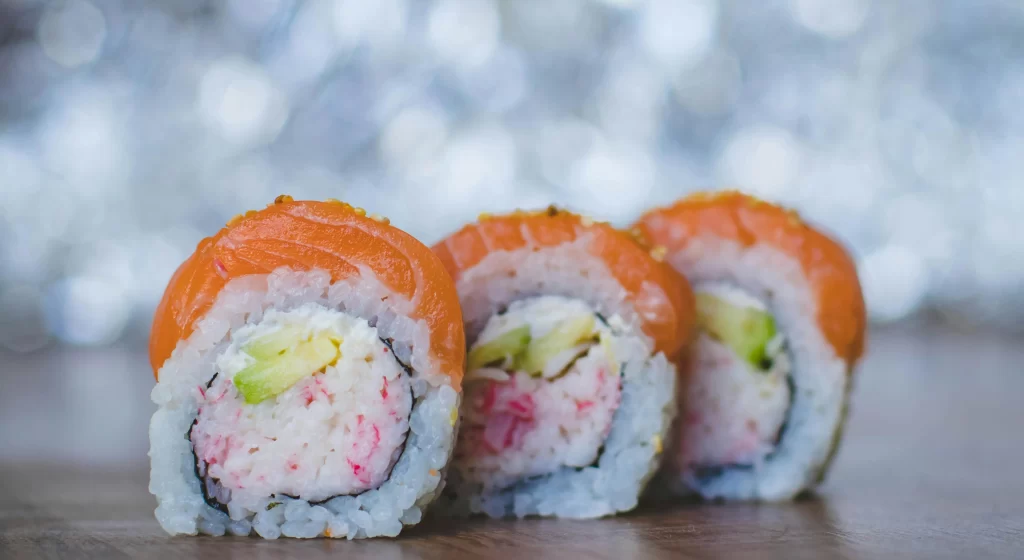
- Fresh Vegetables: Add crunch, color, and freshness with ingredients like crisp cucumber sticks, creamy avocado slices, and vibrant bell peppers. Pickled ginger (gari) is also a classic palate cleanser.
Endless Customization & Flavor Adventures:
The beauty of homemade sushi lies in its adaptability. Don't feel limited to traditional options! Experiment with:
- Cooked Seafood: Smoked salmon, imitation crabmeat (surimi), cooked shrimp, or even leftover grilled fish can be fantastic.
- Other Proteins: Thin strips of cooked chicken or beef (teriyaki-marinated is excellent), crispy tofu, or even egg omelet (tamagoyaki).
- Creamy Additions: Cream cheese (for Philadelphia rolls), Japanese mayonnaise, or spicy mayo (sriracha mixed with mayo).
- Crunch & Texture: Tempura flakes, toasted sesame seeds, or finely chopped nuts.
- Sauces & Toppings: Drizzle with teriyaki, unagi sauce, or sprinkle with furikake (Japanese rice seasoning). Serve with soy sauce and a dollop of wasabi.
One of the greatest benefits is being able to create entirely vegetarian or vegan rolls with ease, loading up on your favorite veggies and plant-based proteins.
Mastering the Roll: Techniques for Various Sushi Styles
With your ingredients prepped, it's time for the most satisfying part: assembly. You’ll need a bamboo sushi mat (makisu) – if you don’t have one, a clean dish towel or even plastic wrap can work in a pinch. Also, keep a small bowl of water handy for wetting your hands to prevent rice from sticking.
Four Popular Sushi Styles to Master:
- Maki Rolls (Norimaki): These are your classic rolls with the nori on the outside.
- Lay a sheet of nori on your bamboo mat.
- With wet hands, spread a thin, even layer of sushi rice over 2/3 to 3/4 of the nori, leaving a strip at the far end clear.
- Arrange your chosen fillings in a line horizontally across the center of the rice.
- Using the mat, lift the edge closest to you and roll tightly over the fillings, pressing down gently to form a compact log. Continue rolling until fully sealed.
- Uramaki Rolls (Inside-Out Rolls): Here, the rice is on the outside, often adorned with sesame seeds or roe.
- Cover your bamboo mat with plastic wrap.
- Spread rice over the entire nori sheet, then gently flip the nori so the rice side is down on the plastic-covered mat.
- Add fillings to the center of the nori.
- Roll tightly as you would a maki roll, being careful to keep the rice on the outside.
- Nigiri: A simple yet elegant style where fish rests on an oval mound of rice.
- With wet hands, shape a small, oblong mound of sushi rice.
- Drape a slice of sushi-grade fish over the rice, gently pressing to adhere. A tiny dab of wasabi between the fish and rice is traditional.
- Hand Rolls (Temaki): These fun, cone-shaped rolls are perfect for casual dining.
- Hold a half-sheet of nori in your hand.
- Spread a small amount of rice diagonally across one corner.
- Add your fillings, then roll into a cone shape.
For more detailed step-by-step instructions on these techniques, be sure to check out our guide on Mastering Homemade Sushi: Rolls, Nigiri, & Hand Roll Techniques.
Pro Tips for Your Homemade Sushi Journey
- Mise en Place: Prepare all your ingredients (slice fish and vegetables, cook rice) before you start rolling. This makes the assembly process smooth and enjoyable.
- Sharp, Wet Knife: For slicing rolls, use a very sharp knife kept consistently wet by dipping it in water between cuts. This prevents the rice from sticking and yields clean, beautiful slices.
- Don't Overfill: While tempting, overfilling your rolls makes them difficult to close and prone to falling apart. Start with modest amounts.
- Practice Makes Perfect: Your first roll might not be magazine-perfect, and that's okay! With each attempt, your technique will improve.
- Serve Immediately: Sushi is best enjoyed fresh. The flavors and textures are at their peak right after preparation.
- Safety First: When working with raw fish, maintain strict hygiene. Use separate cutting boards and utensils for fish, and keep ingredients chilled until ready to use.
Embrace the Joy of Homemade Sushi
Gone are the days of believing sushi is an exclusive restaurant delicacy. With this comprehensive guide and a willingness to experiment, you now have the power to create magnificent, restaurant-quality homemade sushi right in your own kitchen. It's a culinary adventure that offers not just a delicious meal, but a fun, interactive experience perfect for family gatherings, date nights, or a satisfying solo cooking session. So gather your ingredients, grab your bamboo mat, and get ready to impress yourself and your guests with your newfound sushi-making prowess. Happy rolling!
